Wednesday, May 18, 2016

Splitcoast Stampers Sketch Challenge 593

I saw a cool sketch at Splitcoast Stampers this week and thought I'd give it a try.


Everything on this card is hand drawn with the exception of the sentiment which is from PTI.  I used a Copic multi-liner to draw everything then colored it with Copics.  Now that I have it posted, I can see that some of my lines are really wobbly...guess that's what makes it "hand-crafted" LOL!

Thanks so much for stopping in.  I appreciate your visit...and I appreciate each and every comment!

Hugs!
Photobucket


Pin It!

Sunday, May 15, 2016

LIM 276 - One Layer week

The challenge this week at Less is More is to create a one layer card with a theme of the "sea".  I must say I am absolutely tickled pink with my card!  It turned out just perfect for me.  I actually made two cards, but I wasn't so thrilled with the water color card.  For the life of me, I just struggle with water coloring!


This first photo is with the card closed...


This photo is with the card open.  Here's how I did it...I printed the digi image on white card stock. The digital image had a black box around the image, so I erased it in my Silhouette program and stretched the image out so that it would print all the way across the front of the card.  Then I trimmed the right hand edge so that the edge of the umbrella hung off the edge.  To finish it off, I drew three black lines on the inside of the card and then finished the edge of the inside to match the surf, sand, and sky on the front of the card.  Make sense? The first photo is with the card closed so you can see how well it flows. The image was colored with Copic markers and a little clear wink of Stella was added to the water although it doesn't really show up on the photo.  The sentiment is a quote I found on the internet (unknown author) and I printed it on the computer at the same time I printed the digi image. LOVE how this card turned out!  


 I stamped the SU image on a card base made from water color paper.  I colored with distress inks and added a few white highlights with a white gel pen and a touch of clear wink of Stella.n  It was really kind of quick and easy, but I'm rarely satisfied with my water coloring.  Really don't like not having "complete" control over the finished product! LOL!

Thanks so very much for taking the time to stop by!  I love it when you leave me a comment!  

Hugs!
Photobucket


Pin It!

Wednesday, May 11, 2016

CASology 197 and One-Layer Simplicity

I have two cards to share with you today.  One is for the One-Layer Simplicity Challenge and the other is for the CASology Challenge.  Okay...I can hear a few gasps out there...surprised aren't you?  I've managed to get cards made AND get them uploaded to my blog!


I really struggled with the CASology challenge.  Tears (crying) makes me sad....and I'm trying not to do "sad", so I went with tear (as in tearing a piece of paper).


I cut the big "U" with the Cameo, then stamped the dots from PTI in black.  I also used a black marker to go around all the outside edges to give a more finished look.  The sentiment is from SSS and is heat embossed in white on black card stock.  I used a white card base.  I cut two strips - one red and one black - and then tore the bottom edges of the pieces.  I tore the red piece first, then adhered it to the black before tearing the black so that the black piece would be a little longer.  Sounds like it took a while, but it was actually super quick and easy!


This is my "fruity" card for this month's One-Layer Simplicity Challenge.  The strawberry image is from a Flourishes stamp set that I've had for quite a while as is the sentiment.  I stamped the image in Memento black and colored with Copics.

Thanks so much for stopping by for a visit! Hope you're having a great week!  I appreciate your visit and your comments!

Hugs!
Photobucket


Pin It!

Tuesday, May 10, 2016

Happy Little Stampers - Inlaid Die Cutting

Today I made a card that I've been wanting to try for quite some time.  I've had this die and actually used it a time or two, but I really wanted to use it and inlay all the pieces back into it...(which I haven't done because I never could keep up with all the little pieces!)


So here it is...


Just LOOK at all those itty-bitty pieces!  I finally figured out a way to make it a little easier.  I die cut the piece, then turned it over while it was still in the die and put some post-it tape all over the back of the cut image...then I pealed it out of the die.  It's a little fiddly...but much easier to figure out where all the little pieces go! With the complete die cut adhered to the post it tape, I did a little ink blending over the entire die cut piece with 4 different shades of yellow distress inks.  I cut the same die again to get another white grid and added wide score tape to the back of the white grid.  Then it was simply a matter of removing the yellow inked pieces from the post it tape and inserting them into the white die cut.  It makes it easier to remove the small pieces to insert into the white grid if you remove the grid part of the yellow ink blended piece.  Does that make sense? Once I had all the pieces in the white grid, I removed the paper from the back of the score tape on the back and adhered the pieced panel to a white card base.  I added just a few tiny pearls and a sentiment stamped on black and heat embossed in white.  The sentiment is from Hero Arts....it kind of goes with the bright sunshine yellow, don't you think?

Thanks a million for stopping in! I appreciate every visit and if you leave a comment...you'll make my day!

Hugs!
Photobucket


Pin It!

LIM #275 and Addicted to CAS

The challenge at Less is More this week is a color challenge to create a card using pastels and the challenge at Addicted to CAS is to use plaid on your card.  I've managed to get the cards made, took photographs, AND now I'm getting them posted before the challenge is over! YAY me!! 


So....here we go....


Very simple...almost one layer card.  I cut the slope with dies from SSS.  The sentiment is from Hero Arts, and the dragonflies are from PennyBlack.  I lightly inked a background for the dragonflies with some tumbled glass, stamped the dragonflies with memento ink and colored lightly with Copics. There's also a little shimmer on the dragonflies, but the camera didn't pick that up.  After I cut the slope at the bottom of the front of the card base, I added a piece of light pink card stock.


This card was also quick and easy.  I inked the area where I wanted to use the Tim Holtz distressed circles die.  After die cutting the card panel I added just a little more ink (tumbled glass). The butter is a two piece butterfly from Clearly Besotted.  I die cut the solid piece from a light pink card stock, and then cut the top from vellum and colored it on the back side with Copics.  The butterfly trail is tiny little bling.  The sentiment looks washed out, but it's really not.  I stamped it in a SSS fog ink.  Popped the completed panel on a white card base and rounded the bottom corners.


I decided to make a little plaid for my card for Addicted to CAS.  I masked off the top area of the card panel and stamped the plaid using pink, yellow, and blue inks from Hero Arts.  I added a small strip of pink card stock for a more finished look.  The sentiment is from PTI.  Added a couple of Darice clear sequins...and popped the card panel on a white card base.

Thank you for stopping by.  I appreciate all of your comments!  

Photobucket


Pin It!

Tuesday, May 3, 2016

Sharing a Few "Tangles"

One of my nieces recently gave birth to twin girls and her sister also had a little girl just a few weeks later.  These are the tangles I did for each of the new babies.  I've covered the spot where their last name would be...but you get the idea.  I've been doing these names for the new babies in my family, and I hope to be able to deliver them in person shortly...can't wait to hold these babies!


These things always photograph with a gray cast to the paper, but the backgrounds are totally white.

Thanks so much for stopping by....and if you leave me a comment...you'll make my day! 

Photobucket


Pin It!

LIM 274 "lucky Dip" and lots more!

Sorry....but this is another PHOTO HEAVY post!  

I think I've made a card for the last several weeks for the Less is More challenge, but can't seem to get around to getting them photographed and posted on my blog!  The challenge this week at LIM is to create a card using designer paper and keep it CAS....


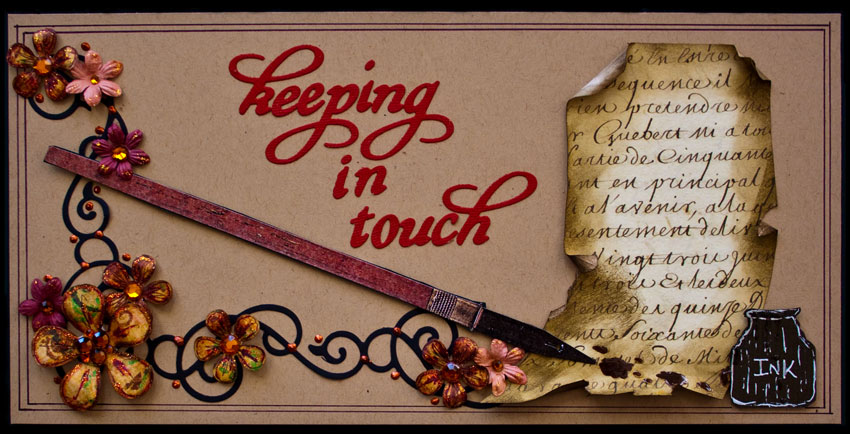
I actually made two cards for this week's challenge and I can't seem to decide which one I like more! I think this first one is probably more CAS....so I'll go with that!  I used some scraps I found in my scrap bin, adhered a strip to both the top and bottom of the card base, added a strip of shiny red paper to finish off the patterned paper.  The sentiment is from SSS and is heat embossed in red.  Added a few sequins to tie the colors together...and done!


I really LOVE this card, but thought perhaps it wasn't CAS enough.  I stamped the peony scroll flowers and leaves on designer paper scraps from my scrap bin, then used copics to add a bit of shading to the blooms.  I used a pink card base and cut a large square opening with a die, then cut a smaller aperture from a piece of white using a stitched edge square die and popped it beneath the pink card front.  I used the square cut from the white and adhered it to the inside of the card base, stamped happy birthday on it (SSS) and added a few rhinestones to finish it off.

This is a card I believe I made for one of the LIM challenges a few weeks age...sigh....The image is a digi image that I made a cut file out of in my silhouette program.  Printed it...cut it out with the Cameo and colored it with Copics.  Sentiment is from Flourishes, I think.


This was a card I made just for fun.  I had a piece of white card scrap on my desk that had a small circle cut from one corner area....so I cut out an oval with a die, inked the card base with some distress inks and popped the panel over it.  The kite is from PTI and the hello is from SSS.  I shaded the sentiment with several shades of distress ink to make it gradually fade at the top of the letters.  The kite and tail are had cut and popped over the oval.


Using instructions from a recent online card class, I made the card above using heavy weight vellum as the front of the card.  I inked the vellum with various SSS inks.  The flowers were heat embossed in white and the white panel has a SSS heat embossed sentiment on it. I really like how this came out, so I might just have to make another one!


I'm LOVING my Altenew stamps!  This flower was stamped and fussy cut before adding to the front of my card panel, as were the leaves. I colored the leaves and the blooms with Copics.  This card also has an aperture cut in the front panel and the card base underneath.  I used the square cut from the white panel to put inside the card to stamp the sentiment on.  The photo below shows the card at a better angle so you can see the dimension.


If you're still with me...Thanks a million!  I appreciate each and every comment.  If you have any questions, please shoot me an email. I hope you'll come back to visit soon!
Photobucket


Pin It!

LinkWithin

Related Posts with Thumbnails